Tuesday, December 23, 2014

Ho, Ho, Ho...shhhh... it's parent Christmas gifts

We made these adorable little reindeer ornaments for our parents today. They were so easy and inexpensive. This is the 2nd year that I've made them with a few new modifications this year.


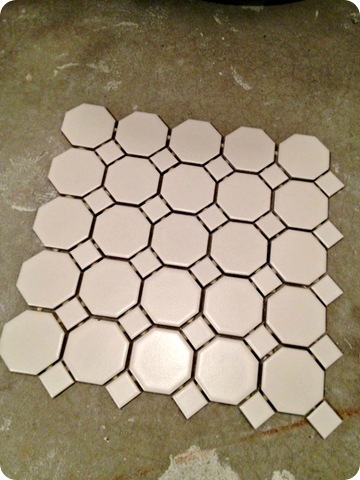
To start, I bought a sheet of white hexagon shaped floor tiles from Home Depot. I think the whole sheet cost all of $3.00 if I remember correctly (I bought this sheet last year and had enough left over for this year's class) There were 36 little hexagon tiles on a sheet. I started by cutting apart the sheet and then separated the hexagons and the squares. I'm not sure what I'll do with the squares, but they were too cute to throw away... maybe good for sorting/counting activities?? They'll likely see the garbage during spring cleaning if they're still in the cupboard without a use this year.


After separating, I used a scissors to quickly cut off the excess adhesive that originally held them together. Next, I had my kiddos come up 1 at a time to do their thumbprint. I had them write their names on the back of the tile along with the year with a Sharpie before we started. I wanted the kiddos to do it so moms and dads have a handwriting remembrance. I then used a foam brush to quickly paint an even layer of paint on their thumb and then they pressed it onto the tile.  We used acrylic paint that I picked up from Wal-mart. The color was Burnt Umber and cost a whopping 89 cents. This little bottle will last you umpteen years! I did all of my class in about 10 minutes (fingerprints only at this time) We let them dry over the lunch hour, but to be honest, they are dry enough within 15-30 minutes for the next step if you don't make the prints too thick. You can see the difference between a one which is a bit thick and one that I consider just right to the left. I like it when you can see the swirls of the fingerprint a bit so parent know it's a print.


A 15 point buck!
After letting the paint dry, I call kiddos to my kidney table 3 at a time for the next step. This step turns the ordinary fingerprint into an adorable reindeer ornament with a Sharpie marker, some white paint and a little bit of puffy paint.  As the kids come back they use a brown Sharpie marker (I bought 3 last year at Home Depot at Christmas time when you could buy individual colors.I think they were about $1.50 each) to draw on the antlers. We do this first so they won't smudge the paint we are about to put on. Once their antlers are done I have them dip the end of a different Sharpie marker into some white acrylic paint (yup, another bottle from Wal-mart) and dab it onto their print where they want their eyes to be. I model this for them so they don't over dip and they do a fantastic job. Next, they use black puffy paint to squirt 2 dots on the white for the pupils and then squeeze some red puffy paint onto the bottom of their print for a Rudolph nose. I honestly can't tell you how much the black and red puffy paint costs as I bought it for other projects many years ago... but that being said, once you buy, you won't likely need to buy more again for MANY years with just a dob here and a dob there.
We then let them sit overnight to completely dry and set up. 
The next day I hot glue on a loop of cute sparkly silver ribbon that they can hang their ornament from the tree from. I always buy my ribbon after the holiday to get it 50% or more off. Each spool usually lasts me 2-3 years depending on how many kiddos I have and I big I make the loops. (I usually have about 18 kiddos in my class) and viola- you have a cute, inexpensive ornament that is a personalized remembrance for parents. I use to do the handprint snowmen ornaments but they started to get expensive and messy to do. THese are so much easier and more durable as well.


Monday, December 22, 2014

Double Digit Numbers and Pic Collage

Our new math program has little lessons called Investigations built into the curriculum. Today we did an investigation having to do with double digit numbers. We spent a few minutes discussing what a double digit number is and giving some examples. We then brainstormed some places that we thought we might find these kinds of numbers. After our discussion, students were paired up and spent 10-15 minutes walking around our classroom and school looking for double digit numbers and taking pictures of them with their iPads.
It was amazing to see some of the places that students found double digit numbers, everything from clocks and calendars to classroom door numbers and  even entrance numbers to our building. I absolutely LOVE this picture of one of my students getting this picture.


After we got back to the room students were asked to import the pictures they took into the app, PicCollage to show their learning. The only stipulations were: 1) you have to work collaboratively and creatively with your partner 2) You must have your names on your collage
3) You need a title for your PicCollage

We've used PicCollage several other times and my students are getting quite adept at maneuvering their way around the app. I did introduce them to a new feature today- cropping their photos, which came in very useful for some of the pics they had taken. They really enjoyed trying this out and it definitely made their learning come more to the forefront of their creations. 

Last time we used PicCollage kiddos figured out how to import photos from the web as their backgrounds. We had Minecraft and Halo backgrounds which really distracted from the learning we were trying to showcase which lead to a fantastic discussion of what would be a better choice. Today,  I again reminded them of that conversation and asked that they find backgrounds that complimented their collage versus taking away from their learning. At that point I let them create as I didn't want to micromanage what may come out of their brains. I was quite impressed to say the least with the choices they made for their backgrounds and their ability to work together so collaboratively from start to finish!!! 


Saturday, December 20, 2014

Simplistic app smash

Looking for an easy and engaging way for your students to practice their spelling words or high frequency words? 
In our class, kiddos use the Magnetic Alphabet app to place virtual magnetic letters onto a variety of backgrounds to create their weekly words. Students love using the different backgrounds to give each of their pics a little extra pizzazz. Once students have finished creating one of their words, they save their image to the camera roll. After they have all 5 of their weekly words created and saved, they import their 5 images into PicCollage where they can creatively put all of their words together onto one page, change the background and then send to their parents. 

Monday, December 1, 2014

SAMR model

I happened across this Thinglink by April Requard as I was perusing Pinterest this weekend. (You can follow her on Twitter at @aprilrequard.)

In our district the SAMR (Substitution, Augmentation, Modification, Redefinition) model is becoming a hot topic of conversation. We have had several inservices this year in which this acronym has come up. As we continue to venture down the path of going 1:1/ 1:2 in our district, we want our staff to be prepared for technology integration beyond the substitution level as we continue to raise the bar for our students, as well as for ourselves. This Thinkglink gives some nice examples of apps that fit under each of the categories and when you click on the nubbin (the little round circle by each app) you'll get the name of the app and a little more information about that app


I've personally used many of these apps in my classroom, yes, even the substitution apps. I truly believe that even substituion apps have a place in the classroom if it ties in with your curriculum and is not just being used for the sake of using technology. For example, my class used the Drawing Pad app last week to record our mental images from a story. Could we have done our drawings on a piece of paper with crayons? You bet we could have, however, the engagement factor in my room went up 10 fold by using our ipads and having the variety of colors and tools available that we wouldn't otherwise have had. Plain and simple, the drawing of our mental image on the iPad was substitution. Taking this simple idea to the Augmentation level, we are able to share our images globally via our class Twitter account or with any of our buddy classes around the Unites States. This is something that we weren't able to do with just paper and pencil. It is definitely a functional improvement and one which my students look forward to. 
The more I embed technology, the more I find myself questioning my use of the technology in my curriculum. Is it simply substitution and if so, is it worth doing? Sometimes the answer is still yes, but other times, no- the time needed doesn't justify the results. How can I take a technology integrated project and take it to the next level? As I've become more comfortable with managing a class set of iPads and more comfortable with curricular components, I often find myself looking to take a project to a new level. I truly believe that as educators technology integration is an path that we need to become comfortable with and sooner rather than later. That being said though, we also need to allow ourselves to move through all four phases of the SAMR model. Not every lesson every day will be at the modification and redefinition level. There is a time and a place for substitution and augmentation within our day. 

How are your using the SAMR model in your classrooms???

Saturday, November 22, 2014

Number stories

Earlier this week we spent some time learning about addition and subtraction word problems. Students have been learning about subtraction language (flew away, broke, got eaten, etc). I really do love the way our new math program introduces subtraction to students. The seem to have a better grasp of it and it doesn't seem to send them away screaming like it did in the past. Well maybe not screaming, but crying definitely showed its ugly head on occasion.

Student creating visual representation of the
pirate problem above
One thing that I have found helps students internalize subtraction language is having concrete examples. We started earlier in the week with these types of examples and then began to work into visual representations. Students were given a word problem and together with a partner had to determine how they were going to solve the problem. Was the language telling them to use addition strategies or subtraction strategies. Once students decided on how they wanted to tackle the problem they worked together to visually represent the problem using Doodlecast Pro. I chose this app as I wanted them to have audio capability to record their thinking once we were done. Thinking about the SAMR model, the beginning of this lesson was just substitution, but the engagement factor of using the iPads definitely helped to keep the learning at the forefront.

As we continued on, students were then asked to record the math sentence that matched their thinking. As they finished, they used the record function of Doodlecast Pro to explain their thinking. This is a fantastic way to delve into the thinking of your students, especially your out-of-the-box thinkers, as it gives you new perspective into the thought processes they are using. I encourage you to give this a try. It has definitely opened new doors for me into how my students are tackling problem, something that I am not always able to discern in a whole group conversation. In the case above, I thought students would make the 9 muffins and then cross of 3 to find out how many muffins were blueberry but instead they used the addition strategy of counting on which they explained in their audio.

In addition to sharing their doodlecasts with me, we also used Air Server to project some of our projects and to share our thinking with the class. For students who are shy this has been a phenomenal way for them to share as they are often comfortable enough to create their audio with a buddy but are uncomfortable in front of the whole group. When we Air Serve they are able to play back their Doodlecast without the pressure of having to be on the spot in front of the group.


Friday, November 21, 2014

Pic Collage for assessment

Yikes, pics uploaded last night, too tired to write the post... better get it up as it's been favorited already. LOL

Over the past few days we have been learning about capacity in math. We've done several hands-on explorations and learned a whole body representation of full, almost full, half full, almost empty, and empty~think head shoulders, knees, and toes with a stop at the hips for half full. The kids loved it and the representations definitely seemed to help them, although half full is still throwing a handful of my kiddos for some reason when having to identify it in real life examples or in their journal. How do I know this you ask, well, for starters, we did an collaborative, real world assessment of these concepts using the app Pic Collage. 

Here's how it all shook down (sorry for the not so pretty Smart board resource on the first image)...
When the kiddos came in on Wednesday I had the Smartboard on with the word capacity and an image of the PicCollage app icon displayed. We had a quick discussion of what capacity was and then I told them they were going to work with a partner to take 5-8 pictures of items around the room that had capacity. After taking their pics, they were to work collaboratively to create a Pic Collage to represent their findings and label the items they found. Seeing as we are first graders, we quickly wrote our capacity words so that teams had a resource to refer to. With the exception of that bit of information, teams were sent on their way to begin the task. It was great to see them talk about the items they were finding and discussing if the object truly had capacity. 

Once their pics were done, they headed to a cozy spot and began working together to create their collages. Again, the conversations were rich with vocabulary and "tech talk". Students began grouping and arranging their pictures, discussing and labeling their examples and of course, putting their creativity to work in designing their piece. 

On a modification side note:
I have one student who is visually impaired and utilized braille as his primary form of writing and reading. Even with his visual limitations, he and his partner were able to complete this activity to the benefit of both. They worked together to find the objects, felt them to check for capacity and when it came time to create on the iPad, my little gal every so gently guided him to move images around using descriptive language such as "Slide it more to the right". Our VI (Visually impaired) specialist also brailled the capacity words which my student used to discuss the items they photographed and when it came time to label on their collage, they took pics of the braille words to use as their labels. It was a great team effort for this group and was a true testament to the fact that kiddos can be supportive of each other no matter their abilities. Both learned from each other in this instance, and learned so much more than just math concepts!

Once we finished our assessment, we got back together as a group and students used Air Server to project their collages onto the SMARTboard. Yes, my students Air Serve independently! (For those not familiar with AirServer, this allows you to mirror whatever is on your iPad through a projector. This has been a fantastic tool for us to share our works with the whole group in a format large enough for all to see. It's also wonderful when introducing apps to students, but more on that another time)
Once their collage was up, groups came up and shared their pics and what they knew about capacity. One of my students even made the connection that iPads have capacity as well. This was an interesting discussion as most first graders need more concrete examples to see how something would be filled and obviously "seeing the iPad fill" is very abstract. To put it lightly, I was simply amazed!! I truly believe that many times we underestimate what our younger learners understand.

Some add'l learning came out of this project as well in regards to presentation as a couple of groups figured out how to add backgrounds from the web and chose Minecraft images to enhance their projects. The kids LOVED them and all wanted to know how to do it, but we found out quickly that the learning was overshadowed by the cool backgrounds. We talked about when a Minecraft background might be more appropriate and what the focus of our collages was. It was a fantastic authentic way to show this without me having to be the bad guy to say, "you can't use ___ or ___ for your backgrounds". The power of this conversation was in the fact that they all experienced it firsthand. Once students know the basic functionality of an app, I try very hard not to micromanage their creativity but rather let the little things like this guide our discussions and learning. Don't get me wrong, students still need to be shown how to use the apps appropriately as "they don't know, what they don't know" but I prefer to be the guide on the side once we have the basics down. It is amazing what I have learned from my students over the years that I wouldn't have learned had I limited them solely to my standards.