Looking to take your professional knowledge up a notch? What better time than over the summer months, sipping umbrella drinks by the pool, and catching some rays! Check out the variety of options below. There's something for everyone!

Showing posts with label Book Creator. Show all posts
Showing posts with label Book Creator. Show all posts
Tuesday, June 23, 2020

Tuesday, April 7, 2020
Sharing Book Creator Projects to Seesaw 📝 📫
Well now that you've sent your Book Creator Project out to students, you're probably wondering...
Here's a video that's made for Kids, to show them how to upload their project to Seesaw. It also walks them through a few formatting tips such as making sure they don't have any extra pages (and how to delete them if they do) and how to make sure their text boxes fit on the page.
"How do they get their completed Book Creator project back to me?"
Here's a video that's made for Kids, to show them how to upload their project to Seesaw. It also walks them through a few formatting tips such as making sure they don't have any extra pages (and how to delete them if they do) and how to make sure their text boxes fit on the page.
Monday, April 6, 2020
Emailing Book Creator Templates 📫
Air Drop is such an Easy Peazy way to share Book Creator templates with students, in fact, I wouldn't do it any other way...
Book Creator templates are an amazing way to share content with your students and for them to interact with that content. I've used template for research topics, author studies, class books, science journals, word sorts, and so much more.
So how do we get these great tools into the hands of our students if we can't AirDrop? We email it to them!!! Watch the video below details on how you save your templates as ePubs to Google Drive and then send them to your students.
UNTIL
remote learning became a thing and I can't feasibly drive to each student's house, sit in their driveway, and send the file to them. 🤣Book Creator templates are an amazing way to share content with your students and for them to interact with that content. I've used template for research topics, author studies, class books, science journals, word sorts, and so much more.
So how do we get these great tools into the hands of our students if we can't AirDrop? We email it to them!!! Watch the video below details on how you save your templates as ePubs to Google Drive and then send them to your students.
Need directions for your students on how to open these links from their email?
Here's a pdf file with directions for your students.
Monday, February 17, 2020

Sunday, January 28, 2018
Hip, Hip, Hooray~ It's the 100th Day!
Here's hoping your 100th day is full of fun, learning, and
global connections!
 |
| Tech Bytes~ 100th Day Edition |
 It's the 100th Day!
Sunday, September 10, 2017
Sharing Book Creator Templates from iOs to iOs
Are you planning to use the Mem Fox Book Creator project I posted about last week for #GRA17? If so, here's an Apple Clips video that will show you how to share that template with your students using AirDrop once you've made your final tweaks to the template.
Monday, September 4, 2017
Mem Fox & Global Read Aloud? ~ True Excitement!
 I 💕 LOVE 💕 Mem Fox and was especially excited when I saw that she was chosen as the K-1 author for this year's Global Read Aloud project!
After seeing so many wonderful resources for the upper level books, I decided I wanted to find a way to create a resource for our youngers to interact with the books as well (#K2CanToo). After a lot of thought, I decided to create a Book Creator template with a hyperdoc feel. What you will see below are screenshots and explanations of each of the pages in the template. The best part is, once you download the template, you can change whatever you'd like before sharing it out with your students.

 The first two pages of the book offer resources and directions for you, the teacher. You'll simply delete those pages prior to sharing the template with your students. Erin Kramer has put together some wonderful lessons to go along with the books and those are linked on this main page. They are also available in her Teachers Pay Teachers store. On the second page there is information about a special edition of the #EpicPals project that Bobbi Hopkins and I put together each month. This special edition is specifically for the Global Read Aloud and is in addition to our normal monthly #EpicPals project.
 This will be the cover of your students' book. The only edit needed on this page is for your students to add their name to the bottom.

Students will see a picture of what the Australian Bush looks like. They will be asked to create a PicCollage of animals they would find in the bush. Use the animals from the story to guide you. You may consider writing these on chart paper to help your students as they look for their pictures in PicCollage (You may use any app that will help you accomplish this goal).

Students will draw a picture of their favorite food and also use the included menu to find the cities that Hush and Grandma Poss traveled to in Australia. If this is difficult for your stuents, consider mirroring your iPad on the smartboard to guide your students around the map if needed.
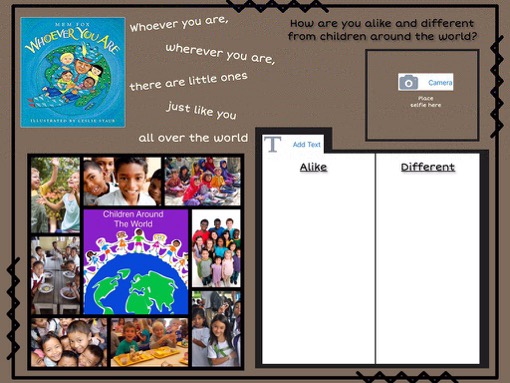
Students will take a selfie of themselves and then compare and contrast themselves to the pictures of children around the world. Students use the Add Text tool to write their ideas.(consider having them also use the Add Sound button to read their ideas).
If your students are not able to write their ideas, simply use the Add Sound button and have them record their likes and differences.

Students will drag the animals to the sentence that they said in the story. (Remember, if your students press the play button in the top right corner, it will read the page to them to help remember what each sentence says) After placing the animals, have students practice reading the sentences with fluency and expression. Then use the Add Sound button and have them record themselves reading the sentences.

After reading the story, talk about Tough Boris' character traits. Then, have your students take a picture of themselves to create their own character traits. PicCollage or Seesaw would be great apps to use. Have your students share their creations to the coordinating Padlet board. (A QR code is embedded onto the student page not seen here. I've also added the QR code to the Padlet board so if you project it onto your smartboard, students can easily scan the QR from your board) This board will give your students another opportunity to compare themselves to others and how we are the same based on the lesson we learned from Whoever You Are

Whatever book you choose for this last week, have your students take a picture and add it to the top left corner (you could also do this prior to sharing the template out if you know which book you're going to use) After reading your selection, have students take a picture of a page that shows the main characters to add to their Book Creator. They will then use the Add Sound button to tell something about the characters.


 |
| Click here or on the image to access the directions to download the Mem Fox Book Creator Template |
One last thing, if you are a Seesaw user, when your kiddos are completely done with this project, have them share it to Seesaw. At this point you'll share it as a video which will keep their voices as part of the file and also flip the pages automatically.

Monday, November 16, 2015
Kids Teaching Teachers
Last week Monday started out a little different than any other. 

We participated in a Google Hangout with Mrs. White in Indiana again, but this time we didn't chat with her students, we chatted with about 20 of her colleagues from various grade levels. Mrs. White had asked if our class would be willing to join their professional development day and talk with them about the Hangouts that we have done. We thought it was pretty special that we, as kids could teach teachers about using Google Hangouts!
 We have started a new ongoing project using the BookCreator app. We are using the app to create a digital learning journal of our Google Hangout experiences. With each connection, students are documenting something they learned or found interesting as well as inserting a map and locating our state and the state of each classroom. This will be a great way for us to practice our map skills in an authentic way in addition to creating an informational text that others can read and enjoy.
 Tuesday, April 14, 2015
Informational Research and Book Creator
We have been working on the genre of informational writing over the past month and just finished up a piece on coyotes. I have a 6 pack and matching big book about coyotes that is at a 1st grade level that works wonderfully for this writing project.
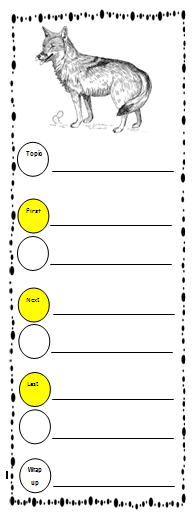 I started by introducing the big book in whole group. We then read the 1st several pages together and took notes about things that we found interesting or that was new information for us. After modeling this format for a couple of days, I passed out the small book versions and partnered students up to continue reading and taking their own notes.
After groups finished reading, they took their post-it notes and sorted them based on like topics. From their they created their plan sheet like the one to the right. Students had to have 3 details (yellows) and 3 elaborations to accompany their details along with a topic sentence and conclusion/wrap-up sentence. I've taught my kiddos to just write "blurbs" on their plan sheets or just enough info to remember their main idea. This has really helped to eliminate copying the authors words verbatim. As students finished their plan sheet they then used it to write their informative piece.
After writing their piece, editing for capitals and periods, reading it to a friend and then checking in with me, they were able to publish their piece using the Book Creator app. This is the 1st time we used this app (last year we used Doodlecast Pro to publish) I created a checklist for students to follow to give them a little more direction while working independently. The checklist was helpful for most and I'll definitely use it again.We had a few small glitches along the way, nothing earth shattering, but we all learned together and I'll make a few tweaks for next year.
 Students had their choice on each page of either creating their own picture or going to Pics4Learning or Photos for Class to chose real life images. Many chose to go onto the sites to get actual images but we still had a good handful of kiddos also create their own pictures. As we have been talking about nonfiction text features over the past months, I added the box on the right of the checklist to challenge my kiddos to add some of these features as appropriate to their book.Obviously photographs and drawings were already embedded. I did have some kiddos add labels to their drawings and also some captions.


I started by introducing the big book in whole group. We then read the 1st several pages together and took notes about things that we found interesting or that was new information for us. After modeling this format for a couple of days, I passed out the small book versions and partnered students up to continue reading and taking their own notes. After groups finished reading, they took their post-it notes and sorted them based on like topics. From their they created their plan sheet like the one to the right. Students had to have 3 details (yellows) and 3 elaborations to accompany their details along with a topic sentence and conclusion/wrap-up sentence. I've taught my kiddos to just write "blurbs" on their plan sheets or just enough info to remember their main idea. This has really helped to eliminate copying the authors words verbatim. As students finished their plan sheet they then used it to write their informative piece.
After writing their piece, editing for capitals and periods, reading it to a friend and then checking in with me, they were able to publish their piece using the Book Creator app. This is the 1st time we used this app (last year we used Doodlecast Pro to publish) I created a checklist for students to follow to give them a little more direction while working independently. The checklist was helpful for most and I'll definitely use it again.We had a few small glitches along the way, nothing earth shattering, but we all learned together and I'll make a few tweaks for next year.
Students had their choice on each page of either creating their own picture or going to Pics4Learning or Photos for Class to chose real life images. Many chose to go onto the sites to get actual images but we still had a good handful of kiddos also create their own pictures. As we have been talking about nonfiction text features over the past months, I added the box on the right of the checklist to challenge my kiddos to add some of these features as appropriate to their book.Obviously photographs and drawings were already embedded. I did have some kiddos add labels to their drawings and also some captions.
For those students who had the extra time, I included a bonus page in which they could do an "About the Author" page and include a selfie. I had a template for them to follow as we have not talked much about this type of page previously. The template basically had them write their name, how old they are, what grade they are in and 2 things they like to do.
Subscribe to:
Posts (Atom)