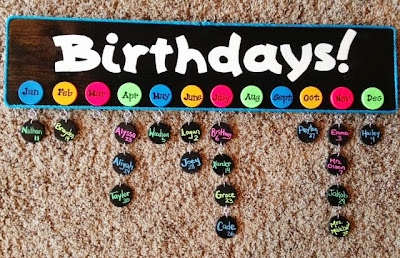
Not too long ago, I came across "Birthday boards" when I was surfing Pinterest. The ones I saw were mostly for families but with a little creativity I transformed mine into a classroom birthday board to match my decor. Here's how I did it:
Materials:
- 6" x 25" board
- 1 1/2" diameter wooden circles (12 + enough for your class and a few extras)
- Acrylic paint colors of your choice for board and lettering
- Black chalkboard paint for class circles (I bought a 4oz craft sized bottle)
- Alphabet stickers
- Modge Podge
- E6000 adhesive
- 9mm jump rings (enough for 2 per circle- not including months)
- 12 eye hooks
- 2 Sawtooth picture hangers (optional)
 |
Next, I painted the front side only of 12 of my circles in the color scheme of my room. After giving them several coats of paint, I added the stickers for the monthly abbreviations. (Many of the boards I found online did just the first letter for the months but I wanted by kiddos to see the abbreviations. I then gave these 2 coats of Modge Podge to give them a glossy appearance and to protect the stickers. After everything was dry, I used E6000 to adhere my month circles to the board. The next day, I then sprayed the entire piece with a clear polyurethane to just give some added protection. You wouldn't have to do this but I felt that it gave a nice overall sheen to the board as well. I used a satin finish polyurethane. I also drilled 1/16th inch starter holes in the bottom of the board at this time to make screwing the eye hooks in easier.
With the remaining circles, I drilled 1/16th inch holes in the top and bottom. I painted them with black chalkboard paint I want an easy way to change names every year. I gave them several coats and did both front and back. After a little experimenting, I decided to use chalk markers to write my students' names. These work great, come off with water, and made it easier to fit the longer names and birthday dates on the circle. They also come in some fun colors- I of course, used neon colors. Last, I added the jump rings to the circles and attached them to the board. I happened to have some blue cording that I attached with hot glue that really made the board "POP!" and Ta Da!!! there you have it, a reusable, unique, classroom birthday board!
Depending on how you are going to hang it, you can add 2 sawtooth hangers to the back, staple ribbon or in my case, I am going to use Command Picture Hanging tabs since I have cinder block walls. If you haven't seen these they look similar to velcro and work like the command hooks with the removable tabs.


No comments:
Post a Comment